Using ModelBuilder class for deploying PyMC models
Motivation
Many users using PyMC face difficulty in deploying or saving their designed PyMC model because deploying/saving/loading a user-created model is a cumbersome task in PyMC. One of the reasons behind this is there is no direct way to save or load a model in PyMC like scikit-learn or TensorFlow. To combat this, We created a ModelBuilder class to improve workflow and use direct APIs to build, fit, save, load, predict and more.
The new ModelBuilder class allows users to use direct methods to fit, predict, save, load. Users can create any model they want, inherit the ModelBuilder class, and use predefined methods.
Let’s learn more about using an example
class LinearModel(ModelBuilder):
 _model_type = 'LinearModel'
 version = '0.1'

 def _build(self):
    # data
    x = pm.MutableData('x', self.data['input'].values)
    y_data = pm.MutableData('y_data', self.data['output'].values)

    # prior parameters
    a_loc = self.model_config['a_loc']
    a_scale = self.model_config['a_scale']
    b_loc = self.model_config['b_loc']
    b_scale = self.model_config['b_scale']
    obs_error = self.model_config['obs_error']

    # priors
    a = pm.Normal("a", a_loc, sigma=a_scale)
    b = pm.Normal("b", b_loc, sigma=b_scale)
    obs_error = pm.HalfNormal("σ_model_fmc", obs_error)

    # observed data
    y_model = pm.Normal('y_model', a + b * x, obs_error, observed=y_data)


 def _data_setter(self, data : pd.DataFrame):
    with self.model:
        pm.set_data({'x': data['input'].values})
        try: # if y values in new data
            pm.set_data({'y_data': data['output'].values})
        except: # dummies otherwise
            pm.set_data({'y_data': np.zeros(len(data))})


 @classmethod
 def create_sample_input(cls):
    x = np.linspace(start=1, stop=50, num=100)
    y = 5 * x + 3 + np.random.normal(0, 1, len(x)) * np.random.rand(100)*10 +  np.random.rand(100)*6.4
    data = pd.DataFrame({'input': x, 'output': y})

    model_config = {
    'a_loc': 7,
    'a_scale': 3,
    'b_loc': 5,
    'b_scale': 3,
    'obs_error': 2,
    }

    sampler_config = {
    'draws': 1_000,
    'tune': 1_000,
    'chains': 1,
    'target_accept': 0.95,
    }

    return data, model_config, sampler_config
Above is an example of a user-created LinearModel which inherits the ModelBuilder class and overrides methods to build, set data and create sample input.
Let’s look at implementation to understand the real-world use of the ModelBuilder class in a better way
First, we import libraries. We need to deploy a model
import pymc as pm
import pandas as pd
import numpy as np
import matplotlib.pyplot as plt
Now we import the LinearModel present in the ModelBuilder.py file
from linearmodel import LinearModel
Now we can create an object of LinearModel type, which we can edit according to our use or use the default model as defined by the user.
Most importantly, if you make _ a really cool model_ and want to deploy the same, it will be easier for you to make a class and share the model so people can use it via the object instead of redefining the model every time they need it.
Making the object is the same as making an object of a python class. We first define parameters we need to make the object like -> data, model configuration and sampler configuration.
We can do that using the create_sample_input() method described above.
data, model_config, sampler_config = LinearModel.create_sample_input()
model = LinearModel(data, model_config, sampler_config)
After making the object of class LinearModel we can fit the model using the .fit() method.
The .fit() method is defined in a manner such that it returns the idata which we can save in another variable per user needs.
def fit(self, data : pd.DataFrame = None):
 if data is not None:
   self.data = data

 if self.basic_RVs == []:
   print('No model found, building model...')
   self.build()

 with self:
    self.idata = pm.sample(**self.sample_config)
    self.idata.extend(pm.sample_prior_predictive())
    self.idata.extend(pm.sample_posterior_predictive(self.idata))

    self.idata.attrs['id']=self.id()
    self.idata.attrs['model_type']=self._model_type
    self.idata.attrs['version']=self.version
    self.idata.attrs['sample_conifg']=self.sample_config
    self.idata.attrs['model_config']=self.model_config
 return self.idata
fit method takes one argument data on which we need to fit the model and assigns idata.attrs with id, model_type, version, sample_conifg, model_config.
id : This is a unique id given to a model based on model_config, sample_conifg, version, and model_type. Users can use it to check if the model matches to another model they have defined.model_type : Model type tells us what kind of model it is. This in this case it outputs Linear Modelversion : In case users want to improvise on models, they can keep track of model by its version. As the version changes the unique hash in the id also changes.sample_conifg : It stores values of the sampler configuration set by user for this particular model.model_config : It stores values of the model configuration set by user for this particular model.
As we know, we only have the object of class LinearModel and not the model. The fit functions call the .build() method if the model is not built yet.
After fitting the model, we can probably save it to share the model as a file so one can use it again.
To save or load, we can quickly call methods for respective tasks with the following syntax.
path = "."
name = "mymodel"
save_model = True # Boolean with default value True
save_idata = True # Boolean with default value True
model.save(name,path,save_model,save_idata)

load_model=True # Boolean with default value True
laod_idata=True # Boolean with default value True

imported_model = LinearModel.load(name,path,load_model,laod_idata)
This saves two files at the given path, and the name
.pickle file that stores the model.nc file that stores the idata
When saving or loading the model multiple times, we might not need to save the model or the idata of the model so we can change the parameters accordingly.
predict() method allows users to do a posterior predict with the fitted model.
# prediction with new data
x_pred = np.random.uniform(low=0, high=1, size=100)
prediction_data = pd.DataFrame({'input':x_pred})
# only point estimate
pred_mean = imported_model.predict(prediction_data)
# samples
pred_samples = imported_model.predict(prediction_data, point_estimate=False)
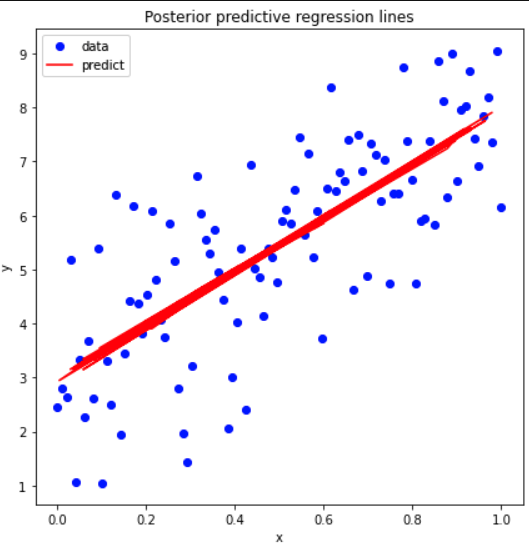
After using the predict(), we can plot our data and see graphically how satisfactory our LinearModel is
plt.figure(figsize=(7, 7))
plt.plot(data['input'], data['output'], 'bo', label='data')
plt.plot(prediction_data.input, pred_mean['y_model'],label='predict',color='r')
plt.title('Posterior predictive regression lines')
plt.legend(loc=0)
plt.xlabel('x')
plt.ylabel('y');
Plots received :

Relevant links